 Quick-start Instructions for all low-friction products (LOFRI and SULOFRI) Quick-start Instructions for all low-friction products (LOFRI and SULOFRI)
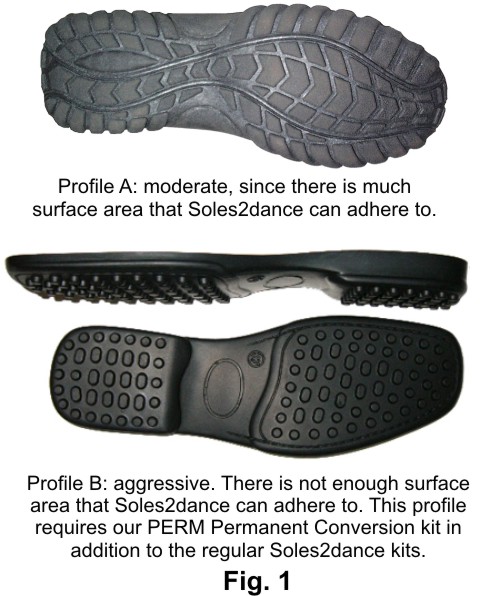
- Make sure the shoes you want to use have enough surface
area for the Soles2dance adhesive backing to adhere to (see Fig. 1).
- Clean the soles of your shoes with a steel brush or such.
- Place shoes on a table, soles facing upward.
- Put the large disks next to the widest part of the sole of each shoe, with the adhesive side facing down.
- Rotate each large disk so that the tiny hole near the periphery points toward the heel, as shown in Fig. 2.
- Peel off the liner of the adhesive backing and stick the large disk onto the sole, as shown in Fig. 3.
- Press the large disk against the sole as hard as you can.
- Do this also for the other large disk for the other shoe.
- Stick on the remaining components. Their position is self-evident and doesn't have to match the right or left shoe.
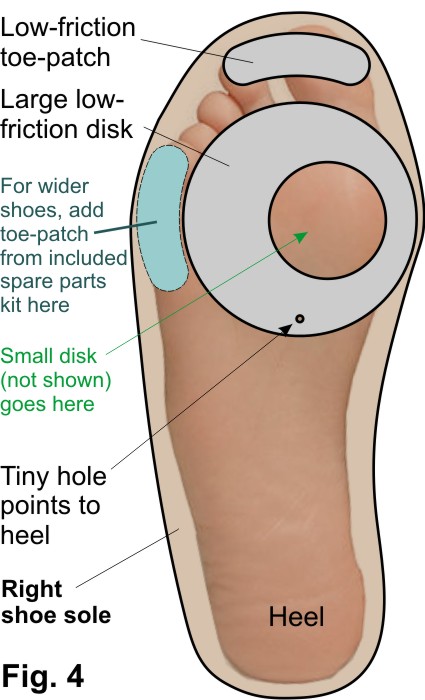
- If your shoe sole is wider than 3-1/4 inches
(82 mm), add the toe patch from the included spare parts kit next to the large
disk, as shown in Fig. 4.
- When all components are attached, put the shoes on and stand on hard surface for a minute. Shift your weight around so that at least for a few seconds each component gets to bear most or all of your weight.
Detailed instructions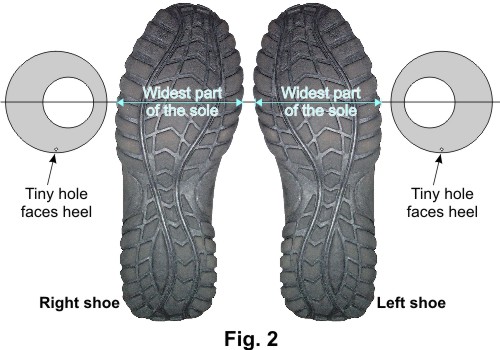 This section explains This section explains
1. which shoes are suitable for Soles2Dance low-friction soles,
2. how to prepare your existing shoes,
3. how to attach Soles2dance low-friction soles.
Which shoes are suitable for low-friction soles
Soles2dance low-friction soles have adhesive backing that will adhere very well to clean, flat soles. However, they will not adhere well to soles with profiles that don’t offer much surface area that is in contact with the low-friction soles. Typically, running shoes have unsuitable profiles. As a rule of thumb: if more than 75% of the adhesive backing of the low-friction soles directly touches the shoe soles, then that’s enough. Less than 75%: not enough. Figure 2 shows examples of soles that do and don’t work with our low-friction soles. For those cases, purchase and apply our PERM permanent attachment base soles first. Dance shoes with suede or hard leather soles usually have no profile at all, making them ideal candidates for our low-friction soles.
Prepare you existing dance shoes
Once you determined that your shoes are suitable, prepare them by rigorously cleaning their soles. The best way to do that is with a steel brush. If you don’t have one, you can try steel wool as used for cleaning pots and pans, or just any brush with stiff bristles.
Determine the location for the Soles2dance low-friction disk
Step 1: The first component to attach is the
large low-friction disk. In order to help you make sure you are sticking the
correct one (i.e., the left or right one) to each shoe, do the following before
you peel off the protective liner of the adhesive backing: lay each shoe on a
table, soles facing up, and lay next to each shoe the Soles2dance low-friction
disk that you are about to attach to that shoe, with the adhesive side facing
down. Note that each low-friction disk has a tiny hole near the periphery. That
hole must point to the heel of the shoe, once attached.
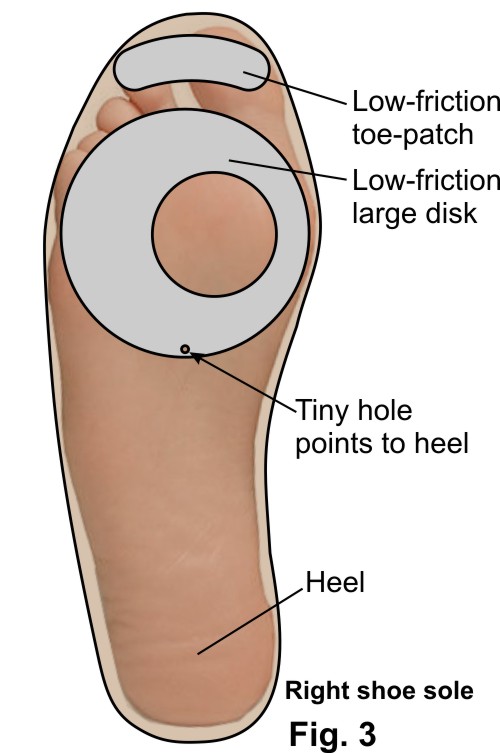 Step 2: Determine where the Sole2dance low-friction disk should be attached longitudinally, i.e., along the length of the shoe. The rule is that the round cutout of the low-friction disk (i.e., the void that will be filled by the small high-friction disk) should be right under the pivot point of your foot when you are pivoting. On your foot, this is roughly the area known as the “ball of the foot.” In practice, this is also the area where your shoe is widest. Figure 3 illustrates this by showing a Sole2dance low-friction disk in the correct position on a semi-transparent shoe sole, with a foot showing through. If you are still unsure, you can try this: wearing socks only, do a pivot move that is characteristic for your dance style. Take mental note of where you feel the most pressure of the floor on your foot as you pivot. That is the place the high-friction disk should end up under. Step 2: Determine where the Sole2dance low-friction disk should be attached longitudinally, i.e., along the length of the shoe. The rule is that the round cutout of the low-friction disk (i.e., the void that will be filled by the small high-friction disk) should be right under the pivot point of your foot when you are pivoting. On your foot, this is roughly the area known as the “ball of the foot.” In practice, this is also the area where your shoe is widest. Figure 3 illustrates this by showing a Sole2dance low-friction disk in the correct position on a semi-transparent shoe sole, with a foot showing through. If you are still unsure, you can try this: wearing socks only, do a pivot move that is characteristic for your dance style. Take mental note of where you feel the most pressure of the floor on your foot as you pivot. That is the place the high-friction disk should end up under.
Attach the Soles2dance low-friction disk
Now
that you know exactly where each Soles2dance low-friction disks will be
attached, peel of the liner of one disk.
Finding a spot where the thin foil can be separated from the adhesive backing
is a little tricky at times. Once you get the liner off, hold the
low-friction disk right above the appropriate spot on the sole, but without
touching the sole. Adjust the position as needed and make sure the tiny hole still
points to the heel. Then, press the Sole2dance disk firmly against the existing
sole. The harder and longer you press, the better, especially near the
periphery of the disk. Repeat this procedure to affix the second low-friction
disk to the other shoe.
 Attach the remaining Soles2dance components Attach the remaining Soles2dance components
The
locations for the remaining components are self-evident. There is no
distinction between a left and a right component, so you don’t have to be
mindful of which shoe each component goes on. The small high-friction disks go
right into the cutout of the large disks. The toe-patches go under the toes.
Make sure your big toe has a good amount of patch under it, your little toe
won’t need it so much. When applying the toe patches, remember to press hard on
them.
If your shoe soles are wider than
3-1/4 inches (82 mm), add the toe patch from the included spare parts kit next
to the large disk, as shown in Fig. 4.
Apply Pressure
Now comes the unconventional part: the strength of the bond between the
disks and the shoe soles depends on the magnitude of the pressure applied at
this stage. In order to apply even more pressure than you can with your bare
hands, put on the dance shoes immediately after attaching all components and
stand on a flat, hard floor for a minute or so. While standing, alternate your
weight from one foot to the other, in order to maximize the pressure acting on
each component. Shift your weight around so that each Soles2dance component
gets to bear most or all of your weight, at least for a few seconds.
How perfectionists do it
The instructions so far are sufficient for all almost all cases and
they work without any additional tools. However, an even stronger bond can be
achieved by using some low-cost tools. One such tool is a clamp and you will
need four of them to do it right. If you have four clamps, proceed as follows:
After bonding all Sole2dance components to the shoes, put the shoes together,
sole-against sole, so that the large low-friction disks make full face-to-face
contact with each other. Now clamp the shoes together such that the most
pressure is applied along the periphery of the large-friction disks. Keep the
clamps on for an hour at least. Repeat this procedure with for the toe patches.
You will need only two clamps.
Back to home page
|
 Deal of the Day